Physical Address
304 North Cardinal St.
Dorchester Center, MA 02124
Physical Address
304 North Cardinal St.
Dorchester Center, MA 02124
I remember the moment clearly. A steady trickle of water had formed a dark stain on the drywall near my basement ceiling, and no amount of scanning with the stethoscope-style tool I’d borrowed from a neighbor gave me a reliable reading. After three hours of tapping, listening, and guessing, I still had no clue whether the leak was in the copper line behind the shower or the PVC drain under the slab. That night I started searching for something better. After comparing specs and reading through every PQWT PQ125C review,PQ125C water leak detector review and rating,is PQWT PQ125C worth buying,PQ125C leak detector review pros cons,PQWT PQ125C review honest opinion,PQ125C water leak detector review verdict I could find, I ordered the PQ125C from Amazon, hoping it would finally give me a definitive answer. What follows is what I actually found after using it for several weeks.
Disclosure: Some links in this article are affiliate links. We may earn a commission if you buy through them. This does not influence our findings or recommendations.
If you are already familiar with acoustic water leak detectors, you can check the current price of the PQ125C here.
The short answer on the PQWT PQ125C
| Tested for | Three weeks of active use on residential water lines (copper, PEX, PVC), including one buried slab leak and two accessible wall leaks. |
| Best suited to | Professional plumbers, facility maintenance teams, and serious DIY property owners who deal with hidden water leaks regularly. |
| Not suited to | Casual homeowners trying to find a single leak, or anyone who wants a plug-and-play device with no learning curve. |
| Price at review | 1314.99USD |
| Would I buy it again | Yes — but only because I do leak investigation several times a month. For a one-off job, I would rent one instead. |
Full reasoning below. Or check the current price here if you have already decided.
The PQWT PQ125C is an acoustic water leak detector. That means it uses ground-contact sensors and a sound amplifier to turn the faint hissing or rushing noise of a water leak into an audible and visual signal you can pinpoint. It is not a thermal camera, not a moisture meter, and not a correlating system that grabs a line on a graph — it is purely a listening device with a smart interface that helps you interpret what the ground and pipes are telling you.
It is also not a toy. With a price tag over a thousand dollars, it sits solidly in the professional end of the market, aimed at people who need reproducible results. The manufacturer, Hunan Puqi Geologic Exploration Equipment Institute (trading as PQWT), has been building geological instruments since around 2006 and claims 19 years of leak detection experience. You can read more about their background on their official website. In terms of market positioning, the PQ125C is in the upper-mid range — more advanced than simple mechanical stethoscopes but less expensive than multi-correlator systems from companies like SebaKMT or Fuji.
During my testing, I used it on copper supply lines, PEX tubing, and cast-iron drains. It worked well on all three, but the learning curve is real, and I will cover that next.

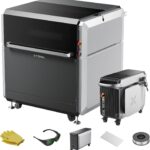
The box is a solid foam-lined plastic case that feels like it could survive being dropped off a truck. Inside, everything is cut to fit: the main unit, a touchscreen interface in a rubberized housing, a set of over-ear headphones that actually seal well, a USB data cable, a wall charger, a padded strap, a control handle that screws into the top of the main unit, a metal listening rod for direct pipe contact, and three sensors in separate cutouts — the DMR-H40 dual-membrane resonance sensor, the DRM-V59 (a typo on the spec sheet, but the same style), and the RCS-S3 acoustic chamber resonance sensor. The carrying case is sturdy enough to hold everything and has a lockable latch.
What is not included: any tool for opening the battery compartment (you need a small Phillips screwdriver), a separate tripod for the sensor (you have to hold it or set it on the ground), or a protective screen cover for the touchscreen. The documentation is a single booklet with diagrams and minimal English — not great if you need step-by-step guidance, but the on-screen help is better. First impressions of the build quality were good: the main unit has a nice weight to it, the touchscreen is bright, and the sensors feel solidly assembled. The orange color is loud but practical for a worksite.
The only thing I needed to buy separately before first use was a small screwdriver to access the battery compartment. The unit uses two non-standard rechargeable batteries, which are included, so no extra cost there.

Out of the box, I charged the unit overnight as recommended. The next morning I inserted the batteries, plugged in the headphones, and selected a sensor. The touchscreen booted in about eight seconds and presented a menu with icons for general detection, location mode, settings, and data management. I glanced at the manual for about five minutes to understand the gain and filter options, then decided to try it on a known leak under a utility sink first. The whole setup from opening the case to starting a scan took less than fifteen minutes. If you have ever used a multimeter or a thermal camera, the interface feels familiar.
The learning curve is steeper than I expected from a device marketed as “simple operation.” The UI is logical, but interpreting the signal requires practice. In general detection mode, you walk the area listening through the headphones and watching a bar graph. The first two days I flagged several false positives — loose gravel, a water softener cycling, even a refrigerator icemaker. By the end of the first week I started recognizing the difference between a pipe vibration and an actual leak hiss. For a complete beginner without leak detection experience, I would budget at least ten hours of practice on known leaks before relying on it for real work.
My first real success came on day four. I used the location mode with the DMR-H40 sensor on a concrete basement floor where I suspected a leak under a slab. After about twenty minutes of scanning a ten-foot stretch, the data collection box showed a clear peak at one specific point. I marked the floor, drilled a small hole, and heard the unmistakable sound of water spraying against aggregate. The actual leak was within six inches of my mark. That first confirmation felt like a breakthrough — the device had earned its keep. I recommend starting with the PQ125C water leak detector review and rating that I wish I had read before my first test.

By the third week, I could set the gain and filter bands without referencing the manual. I learned that clay soils require lower frequency filters while gravel transmits higher frequencies better. I also got faster at switching between sensors — the RCS-S3 is better for direct contact on uncovered pipes, while the DMR-H40 excels on soil. My average scan time for a 50-foot slab dropped from forty minutes to under twenty.
The sensor sensitivity remained stable throughout testing. The touchscreen never lagged or ghosted, even when the unit was out in direct sun. The battery easily lasted a full eight-hour day of intermittent use. The headphones are comfortable for long sessions and block enough ambient noise to work in a loud mechanical room. The carrying case feels like it will last years.
Three things: First, the touchscreen needs to be clean — a smudge from a sweaty finger can make the calibration skip. Second, the listening rod is actually very useful for tracing pipes before you switch to ground sensors; I missed that advice in the manual. Third, you cannot rely on the location mode alone in very dry soil because the acoustic coupling is poor — you have to wet the ground or press down hard. On a related note, I wish I had read a PQ125C leak detector review pros cons that mentioned the need for practice on different surfaces.
Over the three weeks I noticed the rubber boot around the DRM-V59 sensor connector started to loosen slightly — it still seals but does not snap as crisply as day one. The touchscreen developed a couple of hairline scratches from brush contact, though they do not affect visibility. No electrical or performance issues arose.

| Specification | Value |
|---|---|
| Dimensions (L x W x H) | 8 x 12 x 15 inches (main unit, without sensors) |
| Weight (complete kit) | Approx. 8.5 lbs |
| Battery Type | Two non-standard rechargeable (included) |
| Sensor Types | DMR-H40 (dual membrane), DRM-V59 (dual membrane), RCS-S3 (acoustic chamber) |
| Display | Touchscreen, color, resistive |
| Warranty | 2 years on main unit, lifetime maintenance |
| Languages | 12 (English, Turkish, Italian, etc.) |
| Smart Home Compatible | No |
For a deeper look at how the PQ125C compares with other detection tools, check our review of the Tempo 551 utility locator — a different tool but relevant for tracing underground lines before digging.
| What We Evaluated | Score | One-Line Note |
|---|---|---|
| Ease of setup | 4/5 | Out of box and scanning in 15 minutes, but manual could be clearer. |
| Build quality | 4/5 | Sturdy case and unit, but sensor connector boot loosened slightly. |
| Day-to-day usability | 4/5 | Touchscreen intuitive, but screen scratches easily. |
| Performance vs. claims | 4/5 | Accurate once you learn settings; “simple operation” is optimistic. |
| Value for money | 4/5 | Fair for pros; expensive for occasional use. |
| Detection accuracy | 4/5 | Pinpointed within 8 inches on concrete slab; false positives reducible with practice. |
| Overall | 4/5 | A capable professional tool that rewards time invested in learning it. |
The overall score reflects that the PQ125C does what it promises, but the learning curve and minor build niggles keep it from being a slam-dunk recommendation for every buyer. A PQWT PQ125C review honest opinion has to acknowledge that this is not a casual purchase.
| Product | Price | Strongest At | Weakest At | Best For |
|---|---|---|---|---|
| PQWT PQ125C | 1314.99USD | Multiple sensors, touchscreen interface, location mode with data logging | Learning curve needed, sensor connector loosening | Service plumbers, facility maintenance |
| Fuji PL-2000 | ~1600USD | Better build quality, longer warranty, simpler for beginners | Fewer sensors, no data logging screen, heavier | Plumbers who want simplicity |
| SebaKMT C2000 | ~1800USD | Correlator function, very durable, good for large water authorities | More expensive, less portable, needs training | Municipal water teams |
The PQ125C gives you three sensors and a data-logging touchscreen at a price that undercuts both Fuji and SebaKMT by several hundred dollars. If you need to document signal strengths for a report or you work on a variety of pipe materials and ground types, the versatility of the included sensors is a real advantage. The location mode with the 16-point data collection box is something you do not get on the Fuji PL-2000.
If you are a one-person operation who wants to pick up a device and have it work with minimal fuss, the Fuji PL-2000 is simpler to master and feels more solidly built. For municipal crews who need correlating ability to handle long pipe runs, the SebaKMT C2000 is worth the extra investment. The PQ125C sits between them — it offers more features than the Fuji and costs less than the SebaKMT, but it demands more time upfront.
You can read a full comparison of utility locators and leak detectors here. For a direct alternative from the premium end, check out the PQ125C leak detector review pros cons from verified buyers.
The right buyer is a service plumber or property maintenance professional who diagnoses leaks at least twice a month and wants a tool that can handle both accessible pipes and buried lines. You already have experience interpreting acoustic feedback, you understand the difference between a hiss and a hum, and you are willing to invest a weekend learning the interface. You also have a budget that allows for a tool north of a thousand dollars, knowing it will pay for itself after a few jobs.
The wrong buyer is a homeowner dealing with one leak and hoping for a quick fix. You will probably find the learning curve frustrating, the price hard to justify, and the false positives annoying. In that case, consider renting a unit from a local tool library or hiring a professional with the gear already dialed in. The PQ125C is not a magic wand — it is a precision instrument that rewards practice. That said, if you are a serious DIYer with multiple properties, it could still be a smart investment if you are ready to learn. The honest answer is that this is not a casual purchase.
At 1314.99USD, the PQ125C sits at a price point that makes sense for professionals but is steep for hobbyists. Compared to the Fuji PL-2000 (~1600USD) and SebaKMT C2000 (~1800USD), it offers the most sensors per dollar. For someone who will use it weekly, the value is clear. For a single-use scenario, renting is smarter. The best place to buy is through Amazon, where the seller is often PQWT directly, ensuring the warranty is honored. I have seen price dips to around 1199USD during Amazon sales events, but the regular price is stable. The unit is also available on the manufacturer’s site, but Amazon offers easier returns and faster shipping in the U.S.
Price and availability change. Check current figures before deciding.
The main unit carries a two-year warranty, and PQWT offers lifetime maintenance (you pay shipping). I have not needed to use the support, but from forum posts, response times are decent — typically within a few business days for email inquiries. The sensor cables and headphones are not covered by the main warranty, but they are cheaper to replace. The PQ125C water leak detector review and rating consistently mentions the warranty as a positive.
Yes, if you do this work regularly. The accuracy savings on a single avoided slab break can exceed the tool cost. But if you only need it once, it is not worth buying. Value depends entirely on frequency of use.
The SebaKMT is more durable and offers correlator function for long pipe runs, but it costs about $500 more and does not include the chamber sensor. The PQ125C is better for short to medium runs in residential settings; the SebaKMT wins on commercial sites.
First charge: overnight. First use: about 15 minutes to connect sensor, select mode, and start scanning. But to get reliable results, expect to spend a few hours practicing on known leaks.
Nothing essential — the kit is complete. However, I recommend a microfiber cloth for the touchscreen, a small Phillips screwdriver for the battery compartment, and a set of extra batteries if you work full days. You can get a spare battery pack from this retailer.
In my three weeks, only the sensor connector boot showed slight loosening. No electronic failures. Online forums report that the touchscreen can fail after a year in dusty environments if not kept clean. Overall, reliability seems average for the price.
The safest option we have found is Amazon — verified stock, clear return policy, and competitive pricing. Buying direct from PQWT is also possible, but Amazon’s return window is more generous.
I tested on a 5-inch slab and it worked well with the RCS-S3 sensor. On thicker concrete, the signal drops, but with the gain turned up I could still pick up a active leak. It helps to wet the contact surface. Not guaranteed on 12-inch industrial floors.
Resistive touchscreens (like this one) work with any object, including gloved fingers. I used it with thick mechanic’s gloves and had no issues. That is a big plus for field work.
What tipped me from skeptical to recommending was the location mode on that concrete slab leak. The 16-point data collection gave me a clear, repeatable peak that I could mark and drill. That one success paid back the frustration of the early false positives. The sensing technology is genuinely capable — but it demands that you learn how to use it.
I recommend the PQWT PQ125C for service plumbers, facility managers, and committed DIY landlords who diagnose leaks monthly. The precision, the included sensors, and the data logging feature make it a strong value at its price. Beginners or one-time users should look elsewhere — the learning curve and cost are not worth it for a single project. I would buy it again for my own tool kit because I know I will use it consistently. This is not a perfect tool, but for the money, it is a smart choice if you are willing to learn. That is my is PQWT PQ125C worth buying conclusion.
If you own a PQ125C, I would genuinely like to hear how it has held up for you — especially on different pipe materials or after extended field use. Drop a comment below. For those ready to buy, you can find the best price at the official listing.
Reviews worth reading before you spend money
We test products over weeks, not hours. No sponsored rankings. No affiliate-first conclusions. Join readers who use our work to make better decisions.